The study of ancient philosophers, mathematicians, and scientists is a major component of the 5th-grade IMPACT theme. The Story of Science makes these paradigm-shifters come to life, and Pythagoras is one who fascinated my students!
Pythagoras had some interesting ideas about the divinity of numbers and the prevalence of numerical patterns in the universe. His followers were almost cult-like.
Of course, after sharing a little about him, I wanted to introduce students to the theorem for which he is so famous. I wondered if it would be possible to guide students in discovering it for themselves using a simple hands-on activity. The following lesson worked for me, so I’ll share the sequence of steps along with some additional resources to supplement the learning!
MATERIALS NEEDED
Each student will need: (1) one sheet of one-inch graph paper (that’s a link to a free download), (2) at least one sheet of half-inch graph paper, (3) a jumbo craft stick, (4) scissors, (5) glue stick or glue, (6) colored markers or crayons, and (7) notebook or blank white paper

Pass out a sheet of one-inch graph paper to each student and have them trace a triangle in the top left corner, as shown here, using the lines of the grid as a guide and a craft stick as a straight edge. The legs of the triangle should be 3 inches and 4 inches in length. Have them use the craft stick to draw the third side.
Ask: “We know that one side is 3 inches in length, and the other is 4. What would you guess is the length of the third side?“

Many students will use the squares to help them estimate and will guess 5 inches. Some will have other guesses. Ask them if they could check their guess without using a ruler. Hopefully, they will see that they still have most of a sheet of one-inch grid paper left. They can cut out strips of squares to check their guesses.
Once students have determined that the third side is 5 inches in length, ask them if they can figure out how this might have been done mathematically. How might we have used what we know (legs of 3 and 4 inches) to determine that the longest side would be 5 inches?
Students may ponder this, and someone may miraculously see it (or may already know it). However, I’ve been lucky! In my experience, the kids usually first think it might have something to do with consecutive numbers – 3, 4. 5. Have them trace other right triangles, of various sizes, on their one-inch square graph paper and test this idea. Using paper strips to measure, they can eliminate the consecutive-number theory.

Tell students you’re going to give them a huge hint. Pass out half-inch square grid paper to each student. and have them trace, color, and cut out four things: (1) a smaller right triangle with legs 3 and 4 squares in length; (2) a 3×3 square grid, (3) a 4×4 grid, and (4) a 5×5 grid (as shown here).
Once they’ve cut out those shapes, have them arrange and glue them on another piece of paper as shown in the second photo. Ask them if this helps them see some kind of connection. Give students time to ponder this without hints. My 5th graders had been exposed to square numbers and square roots (see this 3rd-grade lesson), so someone usually figured it out.

The next challenge was to test their theory – or proposition – and if found true, to then express it mathematically. I love this part because it’s what real mathematicians do! As they discussed this, they would say things such as, “9 + 16 = 25, so the shorter sides add up to the longer side.” Not exactly! Guide students in expressing what Pythagoras discovered in their own words: that if you square the lengths of the shorter sides of a right triangle, and then add them together, you get the SQUARE of the third side.” Hopefully, you can elicit something close to a2 + b2 = c2. If time permits, have them test this by cutting out larger triangles and, if necessary, grids.
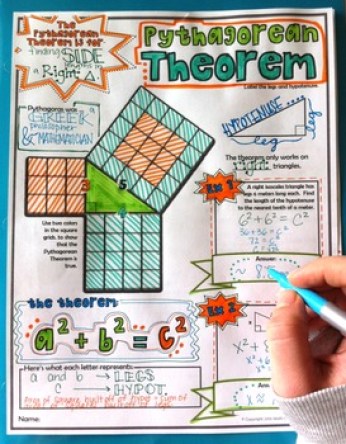
After our discovery, I would read the book shown above, What’s Your Angle, Pythagoras? and we discussed the meaning of theorem; I also reviewed or introduced terms such as right triangle and hypotenuse. Students then created a one-pager in their notebooks about his life, his philosophies, his “cult,” and his theorem. Many students use color and drawings so creatively (somewhat like the Doodle Notes page below)!
| NOTE: There is no extra cost to you, but when you purchase Amazon products linked here, I make a few pennies on the dollar (read more here). This allows me to continue to share free lessons and ideas! So, thank you for any purchases you make using links on this site. |
Once students know the theorem, a good follow-up activity is to practice applying it. After discussing how this theorem might come in handy, my students made up their own problems (see slide show).
Here are some additional resources you might also want to incorporate:
Math is Fun: Pythagoras’ Theorem
Discovering Pythagorean Theorem (video)
Right-Angled Possibilities (NRICH problem)
Hands-On Explorations of the Pythagorean Theorem ~ by Math Giraffe
Where to Land (NRICH problem)
If you have resources to recommend for this lesson, please don’t hesitate to comment below! Also, if you’re interested in being notified when new resources are added to this site, you might like to subscribe. Finally, if you have lessons or resources to share, consider adding to the blog (see Write a Guest Blog Post).


